Invoice Capture
EZ Cloud supports multiple methods for getting invoices into the system. The available capture methods depend on your licensing model and organizational needs.
Capture Methods Overview
| Method | Description | Best For |
|---|---|---|
| Supplier Email | Dedicated email address for suppliers to send invoices | High-volume suppliers |
| Email Integration | Connect to your existing M365 or Google mailbox | Centralized AP inbox |
| Supplier Portal | Suppliers upload directly and track status | Supplier self-service |
| Manual Upload | Upload invoices through the EZ Cloud interface | Ad-hoc invoices |
| Scanner | Scan physical documents directly into EZ Cloud | Paper invoices |
Supplier Email Address
EZ Cloud can provision a dedicated email address for your organization in the format:
customername@ezcloudai.co
Suppliers send invoice PDFs and attachments to this address, and EZ Cloud automatically captures them for processing.
How it works:
- EZ Cloud provisions your dedicated email address
- Share this address with your suppliers
- Suppliers email invoices as PDF attachments
- EZ Cloud automatically captures and queues invoices for processing
Include your supplier email address on purchase orders and in supplier onboarding materials so vendors know where to send invoices.
Email Integration
EZ Cloud connects to your existing email system using adapters for:
- Microsoft 365 (Outlook/Exchange Online)
- Google Workspace (Gmail)
This allows EZ Cloud to monitor your existing AP inbox and automatically pull invoices from incoming emails.
How it works:
- Connect EZ Cloud to your M365 or Google mailbox during setup
- Configure which folders to monitor (e.g., Inbox, specific subfolders)
- EZ Cloud periodically checks for new emails with invoice attachments
- Invoices are automatically extracted and queued for processing
Email integration requires configuration during implementation. Contact your EZ Cloud administrator or support if you need to set up or modify email connections.
Supplier Portal
The Supplier Portal allows vendors to submit invoices directly into EZ Cloud and track their invoice status.
Supplier benefits:
- Submit invoices 24/7 without email
- View invoice status (pending, approved, paid, etc.)
- Ensure invoices reach the right destination
- Reduce back-and-forth communication
Your benefits:
- Invoices arrive in a consistent format
- Reduced manual data entry
- Better supplier relationships through transparency
- Audit trail of supplier submissions
Inviting Suppliers to the Portal
- Navigate to Suppliers → Supplier List
- Add a new supplier or find an existing one
- Check Invite to Portal and submit
- Supplier receives an email invitation to register
See Supplier Management (Essentials) for detailed instructions.
The Supplier Portal is available with EZ Cloud Essentials. Enterprise customers using ERP integration may have different supplier communication workflows.
Manual Upload
Upload invoices directly through the EZ Cloud interface. This is ideal for invoices received outside normal channels or when processing ad-hoc documents.
Uploading an Invoice
- Navigate to Invoices
- Click the Upload button
- Select your PDF file
- Choose invoice pages and supporting documentation
Single Invoice Mode

Use Single Invoice Mode when your PDF contains one invoice (possibly with supporting documents).
Page selection guidance:
- Select only the vendor invoice pages
- Do not select:
- Purchase Order (PO) pages
- Contracts or service agreements
- Packing slips or timesheets
- Cover letters or routing forms
Selecting extra pages can cause incorrect line item extraction. Most vendor invoices are 1-2 pages.
Steps:
- Upload your PDF
- Review the page thumbnails
- Select only the invoice pages (not supporting docs)
- Click Confirm Selection
Batch Invoice Mode
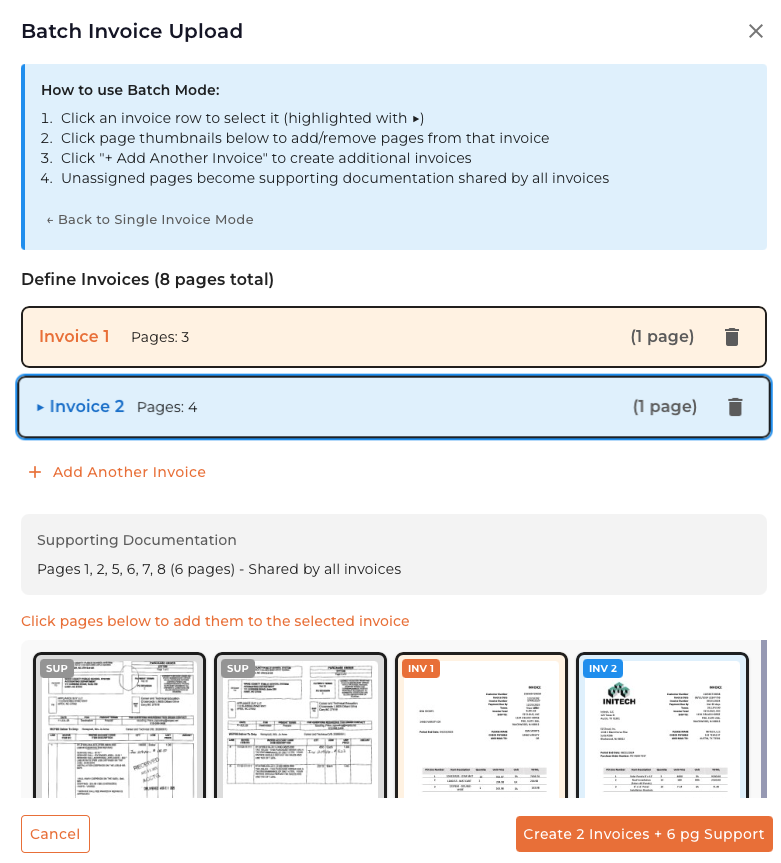
Use Batch Mode when your PDF contains multiple invoices (e.g., a scanned stack of invoices).
How to use Batch Mode:
- Click Switch to Batch Mode from the upload dialog
- Click an invoice row to select it
- Click page thumbnails to assign pages to that invoice
- Click + Add Another Invoice for additional invoices
- Unassigned pages become supporting documentation shared by all invoices
- Click Create Invoices when finished
- Review page assignments before submitting
- Supporting documents (POs, packing slips) are automatically shared across all invoices in the batch
- You can remove pages from an invoice by clicking them again
Scanner Integration
For organizations processing paper invoices, EZ Cloud integrates with document scanners to capture physical documents directly.
How it works:
- Place invoices in your scanner
- Click the Scan button in EZ Cloud
- EZ Cloud launches the scanner interface
- Scanned documents are uploaded automatically
- Proceed with page selection as with manual upload
Scanner integration requires a compatible scanner and driver configuration. Contact your IT team or EZ Cloud support for setup assistance.
Choosing the Right Method
| Scenario | Recommended Method |
|---|---|
| Supplier sends many invoices regularly | Supplier Email or Supplier Portal |
| Existing AP inbox receives invoices | Email Integration |
| One-off or occasional invoices | Manual Upload |
| Paper invoices from mail | Scanner |
| Supplier wants to track invoice status | Supplier Portal |
| Multiple invoices in one document | Manual Upload (Batch Mode) |
What Happens After Capture
Once an invoice enters EZ Cloud through any method:
- Data Extraction - AI extracts invoice header and line item data
- Validation - Data is validated against business rules and supplier records
- Routing - Invoice is routed to the appropriate approval queue
- Processing - Approvers review and take action on the invoice
See the Invoice Processing documentation for details on what happens after capture.